Nicole Curtis Bathroom
Wow. This has been one of the most drawn out projects ever. I am beyond mentally and physically exhausted after this one. Being a full-time attorney and trying to accomplish this bathroom remodel has been tough. BUT, we are finally nearing the finish line!
We finally finished our last DIY job in the bathroom. The countertops have been bought and paid for from Home Depot, so hopefully those will be installed soon and the project will finally be 100% FINISHED! I cannot wait to have my master bath back and finally clean up all the junk in my closet (which is attached).
Everything about this project has been harder than I ever imagined – Nicole Curtis just makes it all seem so easy! The tiling around the bathtub was no exception to this. In fact it probably exceeded every other part of this project in terms of physical labor and mental exhaustion. But, we are finally done and I do have to say that it looks great! I'll let you know if it was worth it in a couple of weeks when my arms and shoulders stop hurting and I've finally gotten a good night sleep with no nightmares about tiling.
For this post, I think it best that I simply give a step-by-step process… I advise that you all read closely and LEARN from my mistakes. Because trust me, there were a lot.
1. Prepping the walls. Easier said than done. The cement board that our contractor installed did not line up with pretty much anything, especially the bathtub. When you are tiling around a bathtub, you actually tile over the lip of the tub. So the concrete board and the tub need to be even to avoid a huge bump or the tile just falling off. With that in mind, my first task was to plaster every area that was not flat in order to ensure a uniform surface. My first mistake was using plaster – I should have used some type of cement like the actual thin set instead. But in the end, the plaster worked OK (and if the tiles fall off the wall it will hopefully be after we sell the house to some innocent buyer…). The surface was, of course, not perfectly level or even, but it was a big improvement from the one inch gap that had separated the cement board and the tub. Also note that we caulked ever screw, nook, and cranny that we possibly could to ensure no water damage later.


2. Setting the tile. Wowzers. This should just not have been as hard as it was. Because the tile is at a 90 degree angle (or close to it in our case), it is recommended that you go ahead and set the first 3 rows a day in advance to make sure that the tile does not slide down as you build up the wall. This should have been a relatively easy feet, but unfortunately, I hit a lot of setbacks and redos. First of all – as soon as the thinset was applied, the plaster immediately reverted to bright pink. After a minor freak out and phone call to Andy (because for SOME reason I had decided to do this while he was at work), Andy assured me that this was probably still OK and that it would just completely dry again as the thinset dried. Like I said, should still probably have gone with some type of cement instead.
I quickly got the first wall up, but when I went to move onto the next wall, I realized the rows would not be at the exact same height. So… I had to redo the first wall which involves popping all the tile off, scraping the wall, and the backs of all the tiles, and starting again. The next wall involved 2 redos that had to do with levelness and the realization the surrounding walls were not at a 90 degree angle and that I would have to start putting up slivers of tiles if I didn't readjust initial tile lengths.
After several redos, several life lessons, hair pulling sessions, and shots (not really, just thinking I should have) we finally got the three rows up as level and even as we possibly could. This was a prefect example of trial and error….


3. After letting the first three rows set up for 24 hours (though I think we got lazy and actually waited 48), we were finally able to put up the rest. While this was not exactly troublesome, it was definitely long and tedious work. Because the tiles are not perfect, we had to stop and check for levelness after ever row (I may have started doing two at a time though). I had bought a score and snap saw for these tiles that I could use because I refuse to use a wet saw in freezing weather. We did this after work, so although it was not particularly challenging, it took us until about 1:00 am to actually finish and clean up. Talk about exhausting.


4. After another day (or two) of rest, we finally finished tiling with all the trim tile. The mosaic tile is ivory travertine to match the floor. Originally we were going to put chair rail tile at the top, but unfortunately Andy did not really have the tools to finish the chair rail on the edge for the one side where it would show. And chair rail tile is hollow, so it just wasn't going to work. Someone really needs to sell an end piece for that. We decided to finish with another round of braid and then just a regular bullnose trim tile. Again, while not super difficult, this was a very tedious and exact process.


5. Grout. Oh glorious grout. So disgusting looking when applied, and such a messy, arm breaking process. But at least non-sanded grout doesn't demolish your hands as much as sanded grout does. This process was not very difficult. Like everything else, it is just very time consuming and kills your arms. Andy had (of course) gone out of town for the entire week following us finally getting all the tile up, so the grouting fell on me. I went ahead and grouted all of the white subway tile first. I didn't plan on splitting it up, I simply forgot to seal the mosaic tile, which is natural stone, first. Something that is a necessary requirement, but adds an extra 24 hour delay. So, this was a drawn out process for me.
After grouting the bottom half and cleaning off the excess with a dry sponge, I cam back a couple days later and sealed the mosaic tile, the dried grout on the subway tile, and the grout on the floor (which we had never done). By that time, I decided to wait until Andy got home to finish up the rest. And boy am I glad I did. Grouting the nice even subway tile was not too bad. Grouting the uneven travertine mosaics and braided ceramic tiles was a bitch. Excuse my french. It was very hard to get the grout lines clean and straight while grouting over such uneven tiles. After I did the middle (and biggest) section by myself, I made Andy come up and help me with the rest. At the rate I was going alone, it would have been another 1 am finish. Luckily we finished up around 10 pm or so and after a lot of cussing and moaning and groaning, we had FINALLY completed the tiling. All that was left was sealing the new grout! Hallelujah, I thought this day would never come!


Stay tuned for the countertop install!! After that, Andy and I will be moving on to (hopefully) new and greener projects in the world of house renovations. 🙂
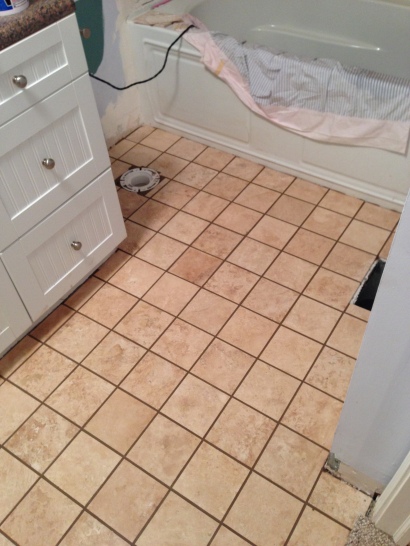
Ladies and Gents, the bathroom floor is officially done!
And man am I chomping at the bit to get this whole bathroom done so I can finally take a long relaxing soak in my new tub…
I don't know if y'all have noticed, but it's been cold down south lately. I mean, cold – like >20 degrees cold. So this has been a pretty intense project. With the walls not completely fixed, and the vent and poop shoot completely open, the cold air has been keeping the bathroom pretty chilly. Not to mention that Andy had to run the wet saw outside in freezing temps. By the end of the night, he was passing me tiles with ice on them. No joke folks. But we persevered and got it done! Just in time to go to the lake and enjoy a bitterly cold weekend sitting by the fireplace.
Of course, nothing in our house is easy. Nothing in our bathroom is level and the walls are definitely not square. So the first thing we had to decide was how to create an optical allusion that would trick you into thinking it is square. The tile before had been done very poorly. Small slivers of tiles filling in cracks and making it blatantly obvious just how NOT square the bathroom is. I wanted no slivers in this bathroom. So in order to determine the best way forward, I went ahead and laid out several tiles to get a feel of the land. This was basically like putting together a giant puzzle… And I love puzzles.
After drooling over the Tile Shop website and concluding that their tile was simply way too expensive, I went to Home Depot and picked out this beautiful travertine (limestone) tile in "Ivory."
 We decided to start by the closet, since this is one of the most visible areas, as well as the only line that ended with a tile threshold (took me forever to remember that word). As you can see below, we snapped a chalk line for the first row in order to make sure I was laying the tile correctly.
 Even though the space is getting progressively smaller, we were able to keep the tile cuts to a minimum by putting a larger gap at the end that will be primarily covered by the trim. We used Versabond fortified white thinset to set the tile. We used the powder form and mixed it with an attachment for my (not Andy's!) corded Ryobi drill.
 While Andy was outside in the frigid cold using his wet saw, I laid almost all the of the tile. However, Andy did take a breather from the cold and lay about 4 tiles before I got impatient and kicked him back out 🙂
 Because of the alignment of the tiles, I was unable to work from both sides in. So I was increasingly pushed back into the corner with the bathtub as I tiled.


Andy would actually hand me the cut tiles through the window to the deck. Talk about handy! (Definitely don't look as good as Nicole Curtis while working… Love that show!)
In order to ensure that the tiles by the bathtub were not small slivers, we had originally cut about a third off the first tiles we laid down by the threshold tiles. This allowed both sides to end in larger tiles instead of one side ending in slivers. Here I am laying the last tile from inside the bathtub at about 9:30 at night.

It was a little tricky getting out of the bathroom without stepping on any of the newly laid tiles, but luckily I did not have to climb out the window like Andy suggested. Instead I jumped onto the countertop and swung myself out like a monkey…

Next, we got to grout on Wednesday night after work. I chose Polyblend Sanded Grout in "Light Smoke" for the floor (we will use the non-sanded version for the walls). I didn't want to go with a super light grout because the water in Atlanta tends to dye things red. I have no clue why. Not going to lie, even though I knew the grout color would change as it dried, I was a little afraid of the doo doo brown color it initially was.

And then, of course we ran out of grout right before the finish line… SO CLOSE! And it was about 9:10 PM so Home Depot was already closed. We (finally) finished the grouting last night – I told you it was doo doo brown originally. It literally looked like we were smearing poop on the floor. Thankfully, it didn't smell quite as fragrant.
 And finally, the finished product! Next up – trim work, toilet, and bathtub tile!


Stay tuned!
One house. One cat (and dog). Several projects. Lots of Whiskey.
Source: https://renoswithwhiskey.wordpress.com/tag/nicole-curtis/


0 Komentar